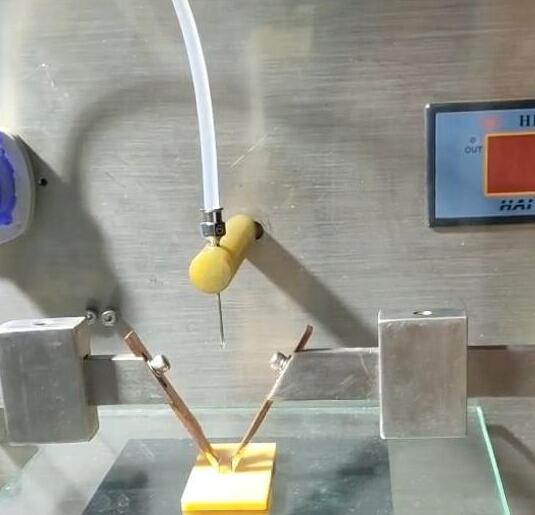
What are the points that need to be paid attention to in the test of the tracking tester?
The tracking tester is a special instrument for testing the relative tracking index and anti-tracking index of insulating materials. It is mainly composed of electrodes, test circuits, test solutions, dripping devices, and sample support tables. The test circuit outputs 100~600V sine wave voltage, the frequency is 48~62Hz, the power supply is not less than 0.6kVA, the short-circuit current between electrodes is 1.0±0.1A, and it is set at the current effective value of 0.50A and lasts for 2.00s.
It is not difficult to see from the composition and structure of the instrument that the most important part of a practical tracking test machine is the electrode, the dripping device and the dripping method. The electrode material is made of platinum with a purity of not less than 99%. The force applied by each electrode to the sample surface is 1.00±0.05N, the electrode spacing is 4.0±0.1mm, and the electrode processing dimensions are shown in Figure 1; The method is the core link of the whole test, and the slow or fast drip will affect the test data. There are three dripping methods of the tracking tester: micro pump, syringe pump and peristaltic pump for customers' reference.

The basic principle of the tracking tester test is:
On the horizontal surface of the sample, place two platinum electrodes and apply a certain voltage between the electrodes to generate the required electrical stress, and then continuously drop electrolyte droplets in the middle of the sample surface between the electrodes until the overcurrent device operates or occurs Continue to burn, or until the test is passed. Failure is caused by tracking, the required number of droplets generally increases with lower applied voltage values, below a critical value tracking no longer occurs. The surface of the sample should be as smooth and flat as possible (if necessary, the surface of the sample can be smoothed by grinding), the non-fabric surface should be free from scratches, blemishes, impurities, etc., and the surface area should ensure that no liquid flows out of the edge of the sample during the drop test. It is recommended that the plane size of the sample is not less than 20mm×20mm, and the thickness is 3mm or thicker (when the thickness of a single piece is less than 3mm, multiple pieces can be stacked to obtain the required thickness). If it is necessary to conduct multiple tests on the same sample, it should be ensured that the distance between different test points is far enough to prevent the flash or smoke generated at the test point from contaminating other areas to be tested. If there is no sample of suitable size, a sample block of suitable size can be cut from the product part, or a sample block can be cut from the sample molded from the same raw material. At this time, care should be taken to ensure that the manufacturing process of the part is the same as that of the molded sample.
During the testing process, the following points should be focused on:
1. Accurately adjust the dripping device, the dripping interval is 30±5s, the dripping time of 50 drops is controlled at 24.5±2min, the dripping height is 35±5mm, the mass of 50 consecutive drops is 0.997~1.147g, and the continuous 20 drops Drop mass 0.380~0.480g;
2. The electrode needs to be cleaned before and after each test, first with a suitable solvent, and then rinsed with deionized water;
3. CTI determination needs to test the maximum voltage value of 5 consecutive samples passing the 50-drop test, and verify the 100-drop test at 25V lower than the voltage value. If 100 drops fail to pass, the maximum withstand voltage of 100 drops needs to be measured value, the test voltage is adjusted in integer multiples of 25V, and when it is not required to measure the corrosion depth, the 100-drop test can be performed before any 50-drop test;
4. The PTI measurement is recommended to be carried out on 5 samples, and the 50-drop test is carried out at a specified voltage, and the test voltage should be an integral multiple of 25V;
5. Conditions for the end of the measurement: the overcurrent device operates, or continuous combustion occurs, or the overcurrent device does not operate or continuous combustion occurs within 25s after the 50th (100) drop of solution falls;
6. Use a depth gauge to measure the corrosion depth, measure the corrosion depth at the tip of the probe with a diameter of 1.0mm at the end of the hemisphere 5 times, the accuracy is 0.1mm, take the maximum value, and when the corrosion depth is less than 1mm, it is represented by <1mm;
7. The test electrodes and samples must be placed in a well-ventilated test box, and it is recommended that the air flow rate in the test box be controlled at 0.2s/m;
8. At the end of the test, it is necessary to discharge the toxic gas in the test chamber in time
2023-02-21 15:47
- Related News
The importance of battery internal resistance testing in the battery manufacturi
Application and structural principle of high and low temperature test chamber
Application of Small Coating Machine in Polyimide Slurry
Principles and selection methods of laboratory incubators
Evaluation of Moisture Absorption and Rapid Drying Performance of Textiles by Na
Liquid Moisture Management Tester
Paper ring compression strength tester standards
