Tile Abrasion Tester Operating Guide
Tile Abrasion Testing Machine
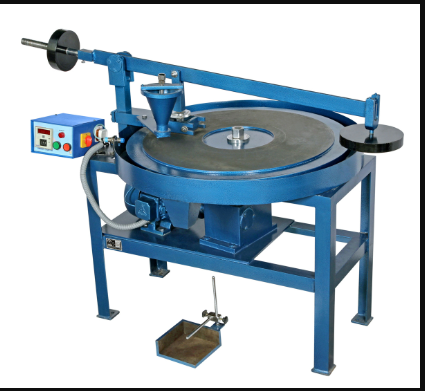
The instrument consists of a main body, a transmission mechanism, a support turntable, eight metal fixture boxes with rubber seals, and an electronic control unit. The motor, through the transmission mechanism, rotates the support turntable at 300 rpm, generating an eccentricity (e) of 22.5 mm. This causes each specimen to move in a circular motion with a diameter of 45 mm, allowing the abrasive to grind against the specimen's glaze surface. The electronic control unit controls the rotational speed according to a preset number, automatically stopping the machine when the preset number is reached. This equipment features a novel structure, smooth operation, low noise, and simple operation. It can test eight or fewer specimens simultaneously. Equipped with a digital time relay, the operator simply turns on the power supply without any monitoring. The machine automatically completes the test according to the set time (rotational speed).
Installation and Commissioning
1. This machine is packaged in a wooden box. Upon unpacking, please check that the instruction manual, certificate of conformity, warranty card, and other documents are complete. Verify that the contents are complete and correct according to the product packing list.
2. Place the tested testing machine horizontally on the workbench and adjust the leveling feet to ensure a stable and level surface.
3. This machine uses a three-phase, four-wire, 380V, 50Hz power supply.
Operating Procedures
Select the grinding wheel and weight according to the test standard. The procedure is as follows:
1. Load dry abrasive into the hopper.
2. Secure the dry, clean specimen to the specimen fixture, perpendicular to the fixture base, with its underside tangent to the friction steel wheel.
3. Turn on the power; the power indicator will illuminate.
4. Preset the test time (2 minutes).
5. Lift the hook at the rear end of the fixture so that the specimen contacts the grinding wheel. Simultaneously, adjust the gate on the hopper so that the abrasive flowing out of the hopper is evenly distributed across the grinding area, at a flow rate greater than 1 L/min.
6. Press the start button. The motor will start. When the grinding time reaches the preset value, the grinding wheel will automatically stop. At this time, close the abrasive adjustment gate to stop the abrasive flow.
7. Move the fixture, remove the specimen, and use a 0.1mm gauge to measure the length of the grinding groove chord on the specimen. Test at two different, perpendicular locations on the front of each specimen.
Precautions
1. The tester should be mounted on a stable foundation. Adjust the anchor bolts to ensure the instrument is stable.
2. When turning on the power, pay attention to the motor's forward and reverse rotation direction. (The grinding wheel rotates counterclockwise when facing the operator panel.)
3. During use, the grinding wheel must be replaced when wear reaches 0.5% of its initial diameter.
4. Determine the specimen size based on the fixture size. If the specimen is too large, it can be cut. If it is too small, it can be seamlessly adhered to a larger base plate using adhesive.
5. Abrasives cannot be reused.
6. After each test, wipe the instrument clean and keep it clean at all times.
7. If the specimen becomes loose during the test, pause the test immediately and re-clamp it before continuing.
8. After the test, turn off the power switch and disconnect the main power supply.
9. When the steel drum shows a certain amount of wear, it needs to be removed for repair or replacement.
2025-08-19 14:49
- Related News
Tile Abrasion Tester Operating Guide
STD-PH Series High Pressure Gas Sorption Analyzer
Maintenance Guide for Washing Color Fastness Tester
Warm-Body Sweat Manikin: A New Tool for Clothing Thermal Comfort Testing
Double-station Taber abrasion tester